How To Activate Your Wireless Soil and Substrate Sensors

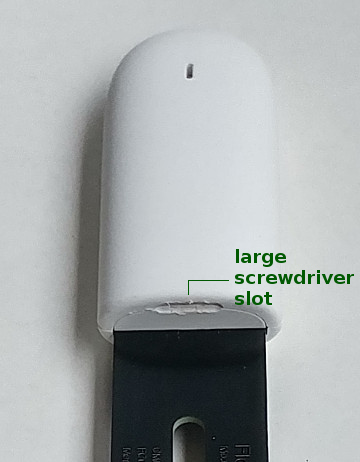
The first step for activating your BLE sensors is to open the housing. The next picture shows how this is done, and it does take some practise to open it easily, due to the tight seal.
 This picture shows where there is a recess that allows you to use a large flat blade screwdriver to pry open the battery cover. Please be sure to use a fairly large screwdriver, otherwise you will damage the plastic (like we did in this picture).
We found that if you use this slot to pry it open a little bit, you can then insert the screwdriver blade between the battery cover and the housing (this will become more apparent as you separate the two parts).
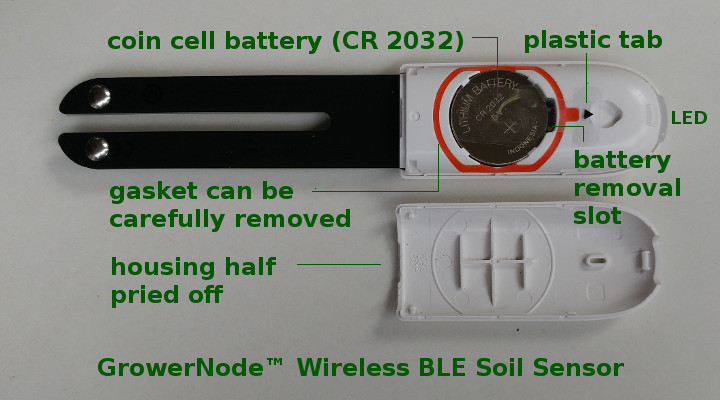
The battery cover will be released, and don't be surprised if the cover suddenly pops off. It is a very tight fit to ensure that this sensor is weatherproof. In the next picture you can see the orange rubber gasket that seals the electronics off from the air (and moisture).
Although the weatherproof seal is very good, these units are NOT waterproof (as in SUBMERSIBLE), so we recommend that you cover it with a small transparent "baggie" if it is going to be used outside in the rain (or if you may end up spraying water on it when irrigating).
The next step will be to activate the battery (replacement part # CR-2032), which will turn on the soil sensor.
Activating the Soil Sensor Battery
The coin cell "button" battery has a transparent plastic insulator that prevents the battery from making contact with the battery terminals underneath the battery. There is a tab with a black triangle on it, as marked in the picture below, and you will need to pull on the tab to slide out the piece of plastic. This action will allow the battery to make contact with the battery terminals, thus activating the sensor.

You may find it difficult to grab the tab to remove the insulator, and it may be easier to simply remove the gasket and/or the battery in order to activate the sensor and bring it online. This is quite ok, as long as you are careful not to damage anything (especially the rubber gasket).
The LED Will Confirm That You Have Activated the Sensor
When the insulator is removed and the battery makes contact with its terminal springs the LED on the end will fade up to full on and fade back off 3 times to let you know you have successfully activated the sensor. This may be difficult to see if the room has bright lights, or if you are outside, so you may want to shield the sensor somewhat in order to see the LED activation.
These are excellent, well made sensors, but because the battery consumption is so miniscule, they have a limited range of about 20 yards (18 meters). This is why we developed our Collector unit - it transmits the data from a cluster of these sensors to your WiFi router, then onto the Internet from there. Please see the article series at the bottom of this page, if you need more information.
You can purchase the soil moisture sensors, along with the Collector units in our sister DIY online store DIY online automation store.
We sincerely hope you enjoy our advanced technology products; if you have any questions, please contact us at any time!
Adrian Biffen
Senior Partner
GrowerNode™ Greenhouse Automation
G.R.O.W.S. System Article Series
|
G.R.O.W.S: GrowerNode Realtime Optimal Wireless Sensors |
The Collector:Part 1: Wireless Soil Sensor Collector Overview Part 2: Menu: Wireless Sensor Detection Process Part 3: Menu: Wireless Soil Sensor Testing Process Part 4: Menu: Wireless Soil Sensor Sleep Modes Part 5: Menu: Edit Collector Settings Part 6: Menu: Restore Collector Defaults Part 7: Menu: Activate Factory Re-set |
The Sensor:Part 1: Wireless Soil Sensor Overview Part 2: Wireless Soil Sensor Activation |
|
The Cloud:Part 1: See Your Data from Anywhere |
